Richard Manning
Pink Floyd Wish You Were Here 1975

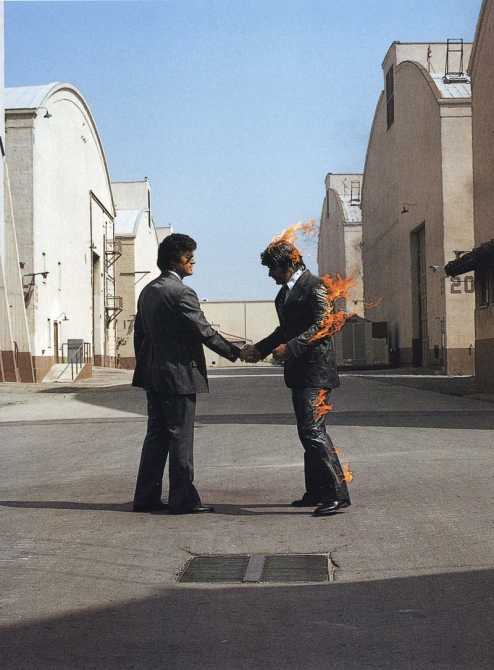
The Dye Transfer front cover image of the Flaming Man. He was covered in petrol that glistened dramatically in the blazing sun( the image shown is the unretouched version). I had to remove all the evidence of the petrol. By using Photo dyes, a mixture of dark grey with touches of magenta and cyan applied delicately to the shiny areas, I was able to gradually build up to match the darkness of the unaffected suit. He was wearing a flame proof wig and neck protector which I had to remove. First, with a weak solution of bleach, lighten the dark areas on the side of his neck then blend the bleached area with photo dye to match the neck tone. The tarmac round the drain in the foreground needed some tidying up and then some general spotting overall. The scorch mark on the right hand side was a separate Dye Transfer. The background to this print was bleached to white and then put together at the printing stage.
The Dye Transfer of the Man in the Desert. The features of the face were removed by gently bleaching the eye and socket, the lips and leaving the subtle contour of the nose,lips and chin. Having bleached the dark areas, magenta, blue and yellow dye in watery amounts were applied by brush to lighter areas to blend with the surrounding skin colour. Blue was used to neutralize the orange effect of the yellow and magenta. Although on the printed sleeve the face does appear quite orange.The wrists were bleached almost to white, having first masked the areas to be worked on with transpaseal and cutting round the image of the man and vinyl, and leaving the man masked so no bleach went onto him. Having bleached the wrists to white, a watery bleach solution was gently applied in a larger area away from the wrists so as to leave a soft edge, which then made the task of replacing the blue of the sky not quite as difficult. Retouching plain colours was always more difficult than replacing multi-coloured areas. I used the Cyan dye from the Dye Makers with a Sable brush and gradually built up the colour. Just a minor touch of Magenta was used to add warmth to the blue.Then the the legs and briefcase were masked leaving the leg showing between the sock and trouser to be blended as sand. The dark area on the right hand side was lightened by applying Photoflo to the area to remove a lot of the Magenta. This was blotted and wiped away with Acetic Acid, leaving it quite green. Then a Potassium Permanganate strong solution applied which was then wiped away leaving just yellow. Now this area was lighter than the sand I was able to apply a combination of the three Primary colours plus watery black by brush in a stipple to achieve the sand behind. Finally with the grainy airbrush a very subtle whiff of watery black applied to the missing leg area. Then any spots removed. A Dye Transfer of the sand breaking through at the bottom of the picture had the background bleached to white and positioned at the printing stage.
The Dye transfer of the Red Scarf. Not a great deal of work. If you look closely, there is a naked girl in the field behind the scarf. She has her arms outstretched and her white blouse undone to reveal her breasts. She had already removed her pin striped jacket which was laying on the grass beside her. I had to remove the jacket and redraw the grass and a little of the scarf. I masked the scarf edge and applied Photoflo to the dark jacket to remove the red. I needed to remove most of the red, so left the Photoflo on for perhaps 5 minutes. Wiped away with Acetic Acid leaving a healthy dark green. Then quite strong Potassium Permanganate, neutralized with Sodium Metabisulphate and washed with Acetic Acid. With the lighter greeny/yellow tone remaining, I was able to blend and redraw grass and dark shaded areas in a semi arbitrary way. The slight darkness behind the scarf was reduced by applying Potassium Permanganate briefly which was enough to remove some Cyan, leaving a slight orange colour which needed just a touch of Magenta to blend with the rest of the scarf. A string that held the scarf at the top corner to allow the scarf to flutter in the wind, but not blow away, went straight to the top of the picture across the sky. Again, the dark areas were bleached with a solution of Potassium Permanganate and Sulphuric Acid, neutralized and cleaned with Acetic Acid. With my trusty Sable brush and watered down Cyan I carefully blended the light areas with the sky and spotted the rest of the print. Storm gave me the shape of the wavey edges, signifying Wind. Transpaseal was applied to the whole picture, the shape traced in position, transpaseal carefully cut with the scalpel, then with a strong solution of bleach, remove the background.
And finally The Diver with a reflection and no splash. No work for me involved here except a bit of spotting and bleaching out the background of the Dye Transfer of the water breaking through at the bottom of the picture. The two images positioned at the printers.


